지난 번 포스팅에서 DataBinding에 대한 기초 실습을 통해 어떤 방식으로 DataBinding을 하는지 알아보았다.
이번에는 BindingAdapter라는 걸 이용하는 실습을 해보겠다.
BindingAdapter란?
리사이클러뷰 아이템 요소에 프로필 사진, 이름, 나이가 들어간다고 해보자.
DataClass에는 프로필 사진 Url (보통 이미지는 Glide를 이용하기 때문), 이름, 나이 요소가 들어가 있을 것이다.
data class ProfileData(
    var profile : String,
    var name : String,
    var age : Int
)
우리는 데이터 바인딩을 할 것이기 때문에 각 요소를 바인딩 시켜주는 작업은 xml에서 진행을 할 것이다.
그런데, 여기서 문제가 발생한다!
바로 위에 있는 profile 변수에 있는 Url값을 어떻게 xml 이미지 뷰에 넣어준다는 것인가...?
    <data>
        <variable
            name="user"
            type="org.techtown.databinding.ProfileData" />

    </data>
    ...
        <LinearLayout
        android:layout_width="match_parent"
        android:layout_height="wrap_content"
        android:orientation="horizontal"
        android:gravity="center_vertical">

        <ImageView
            android:id="@+id/item_profile"
            android:layout_width="160dp"
            android:layout_height="160dp"
            android:src="@{user.profile}"
            />
	...
단순하게 src 속성에 @{user.profile}을 집어 넣어버리면 오류가 날 것이다. (profile은 String이기 때문에)
이럴 경우 BindingAdapter를 이용해주면 된다.
BindingAdapter는 사용자가 BindingAtrribute를 정의하고, 그 내부 로직을 작성할 수 있게 만들어 준다.
쉽게 표현하면 본인이 만든 함수 등을 View에 적용시킬 수 있게 해주는 것이다.
이 전에서 실습으로 보여준 "android:onClick"과는 다른 느낌인데, 이전에 했던 클릭 이벤트 같은 경우는 단순히 함수를 바인딩시켜준 것 뿐이고, 지금하는 BindingAdapter는 새로운 기능 정의 및 로직을 작성하는 것이다.
list_item.xml
    <data>
        <variable
            name="user"
            type="org.techtown.databinding.ProfileData" />

    </data>
    ...
        <LinearLayout
        android:layout_width="match_parent"
        android:layout_height="wrap_content"
        android:orientation="horizontal"
        android:gravity="center_vertical">

        <ImageView
            android:id="@+id/item_profile"
            android:layout_width="160dp"
            android:layout_height="160dp"
            app:imageUrl="@{user.profile}"
            />
	...
list_item.xml에서 "app:imageUrl="@{user.profile}"이란 부분을 살펴보자.
app:imageUrl은 BindingAdapter를 이용해 새로 정의할 부분이고 이 곳에 user.profile의 값을 바인딩 시켜줄 것이다.
BindingConversions.kt
object BindingConversions {

    @BindingAdapter("imageUrl")
    @JvmStatic
    fun loadImage(imageView : ImageView, url : String){

        Glide.with(imageView.context).load(url)
            .error(R.drawable.pg)
            .into(imageView)
    }

}
BindingConversions라는 이름의 파일을 하나 만들고 거기에 BindingAdapter를 생성하였다.
BindingAdpater를 쓸 때 주의할 점은 메모리 상에 올리고 사용하기 때문에 Static으로 만들어 사용해야하며,
Kotlin에서는 자바와 다른게 class가 아닌 Object로 설정해야한다. "@JvmStatic"은 Static 함수로 설정해주기 위한 Annotation이다. 함수에 들어오는 파라미터는 View와 바인딩시켜준 값이다. 여기서 "url : String"은 xml에서 설정해준
"user.profile"이 될 것이다. 함수 내부를 살펴보면 Glide를 이용해서 프로필 사진이 들어갈 이미지뷰에 그림을 넣어주고 있다. error 부분은 Glide에서 load()에 문제가 있을 경우 대신 들어갈 이미지를 의미한다. 직접 저렇게 넣어줘도 되지만,
xml코드에서 BindingAdapter를 이용해 사용해도 될 것이다.
    <data>
        <variable
            name="user"
            type="org.techtown.databinding.ProfileData" />

    </data>
    ...
        <LinearLayout
        android:layout_width="match_parent"
        android:layout_height="wrap_content"
        android:orientation="horizontal"
        android:gravity="center_vertical">

        <ImageView
            android:id="@+id/item_profile"
            android:layout_width="160dp"
            android:layout_height="160dp"
            app:imageUrl="@{user.profile}"
            app:error="@{@drawable/pg}"
            />
	...
요렇게 xml에서 설정 후 코드에서 BindingAdapter를 이용하면 될 것이다.
object BindingConversions {

    @BindingAdapter("imageUrl","error")
    @JvmStatic
    fun loadImage(imageView : ImageView, url : String, error : Drawable){

        Glide.with(imageView.context).load(url)
            .error(error)
            .into(imageView)
    }

}
BindingAdapter 내에 여러개의 속성이 들어와도 된다.
또한, 이미 기본적으로 정의되어있는 속성의 로직을 다시 짤 수도 있다.
출처 : Android Developer BindingAdapter
  @BindingAdapter("android:paddingLeft")
    fun setPaddingLeft(view: View, padding: Int) {
        view.setPadding(padding,
                    view.getPaddingTop(),
                    view.getPaddingRight(),
                    view.getPaddingBottom())
    }
MainActivity.kt
....
fun setRcv(){
val profileAdapter = ProfileAdapter(this)
binding.mainRcv.layoutManager = LinearLayoutManager(this)
binding.mainRcv.adapter = profileAdapter
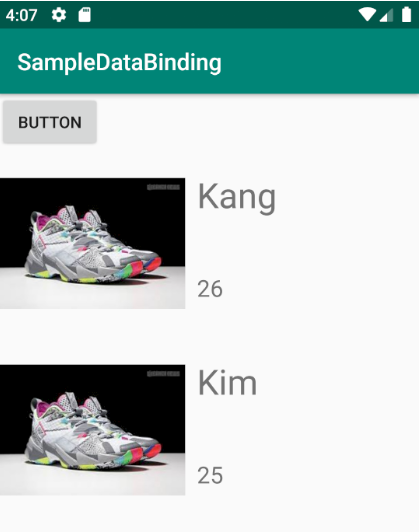
profileAdapter.data = listOf(
ProfileData(profile = "이미지 url", name = "Kang", age = 26),
ProfileData(profile = "이미지 url", name = "Kim", age = 25)
)
profileAdapter.notifyDataSetChanged()
}
....
MainActivity에서 본인이 원하는 이미지의 url을 집어 넣어 준다.
위와 같이 작성한 후 실행시켜 보면 정상적으로 그림이 들어간 것을 확인할 수 있다.
BindingAdapter를 적용할 때 자꾸 오류가 나서 왜 안되나 했더니만 object로 만들어주지 않아서 그랬다...
엄청난 삽질 끝에 결국은 해내서 너무나 기쁘다 ㅎㅎㅎ
천천히 읽어보면서 실습을 해보면 어떤 방식으로 사용해야 하는지 감이 오게 될 것이다.
Git에다가 실습 코드를 올려두었으니 한 번 확인해보길 바란다.
https://github.com/kangmin1012/AndroidExcercise.git
kangmin1012/AndroidExcercise
Contribute to kangmin1012/AndroidExcercise development by creating an account on GitHub.
github.com
위의 링크를 누르고 DataBinding브랜치로 이동하면 실습한 프로젝트가 나올 것이다.
다음에는 실시간 데이터 관찰을 위한 Observable객체를 이용하는 법을 포스팅 하겠다.
'안드로이드' 카테고리의 다른 글
| [Android/Kotlin] 카메라로 사진 찍고 이미지뷰에 넣기 (0) | 2020.02.19 |
|---|---|
| [Android/Kotiln] DataBinding(데이터바인딩)3 - Observable(실시간 데이터) (1) | 2020.02.06 |
| [Android/Kotlin] DataBinding(데이터바인딩) 1 - 기초 (2) | 2020.01.24 |
| 자 이제 무엇을 할것이냐? (MVVM 패턴) (0) | 2020.01.15 |
| [Kotiln/Android] TabLayout과 ViewPager를 이용한 화면 이동 (3) | 2019.12.18 |