어플에 생동감을 더해주는 방법으로 애니메이션이 있다. View의 이동, 확대/축소, 회전, 투명도 조정 등 다양한 애니메이션을 사용할 수 있다. 그 중 아이콘에 대한 변화를 주는 애니메이션을 사용할 때 VectorDrawable을 많이 사용한다.
음악 어플에서 흔히 보이는 아이콘인 시작/멈춤 아이콘 변경 애니메이션을 직접 만들어보면서 어떤 식으로 동작하는지 공부하고, 직접 스스로 응용해보면 좋을 것 같다.
Vector Drawable이란?
Vector Drawable이란 path라는 정보를 통해 Drawable Resource를 그리는 것을 말한다.
말이 어렵게 되있는데, 간단하게 말하면 좌표평면 상에 점을 이용해 그림을 그리는 것이다.
이해를 돕기 쉽게 예시를 들면 우리가 학생 때 배우는 함수 그래프 등을 생각해 보면 된다. 두 개의 점을 좌표 평면상에 찍고 그 두 점을 지나는 선을 그렸던 기억을 살리면 이해하기 쉬울 것이다.
아이콘을 만들어보자!
애니메이션을 적용하기 전에 먼저 애니메이션을 적용할 아이콘이 필요하다. 이 아이콘은 우리가 직접 만들게 되는데 위에서 설명한 path 속성을 이용해서 만들게 된다. 다음 코드를 보자.
res/values/paths.xml
<?xml version="1.0" encoding="utf-8"?>
<resources>
    <string name="path_start">
        M 0 0 L 0 12 L 0 24 L 24 12 Z
    </string>

    <string name="path_pause_left">
        M 0 0 L 0 24 L 10 24 L 10 0 Z
    </string>

    <string name="path_pause_right">
        M 14 0 L 14 24 L 24 24 L 24 0 Z
    </string>


</resources>
이번 실습에서 사용할 path 속성 값들을 paths.xml이라는 파일을 하나 만들어 보관하고 있다.
path는 위에서 설명한 대로 그림을 그리는 방법이다. path 하나당 그림이 하나 그려진다고 보면 된다.
그림은 Drawing Command라는 사용법을 통해 그려진다. Drawing Command를 하나씩 살펴보자.
- M x, y : 새로운 path(그림)를 x,y 위치에서 시작한다는 의미
- L x, y : 현재 위치에서 x, y 위치까지 직선을 그린다는 의미
- C x1, y1 x2, y2 x, y : 곡선을 그리는 커맨드, x1, y1 x2, y2는 양 끝점을 의미하고 x, y 는 컨트롤 점을 의미한다.
- Z : M으로 설정한 시작 위치로 돌아오며 path를 끝낸다.
C는 이번 실습에서 사용하지 않았지만 간단하게 의미하자면 x, y가 현재 위치에서 x, y 위치까지 이동한다는 뜻이고,
x1, y1 x2, y2가 커브를 돌면서 경유하는 위치라고 생각하면 이해하기 쉽다.
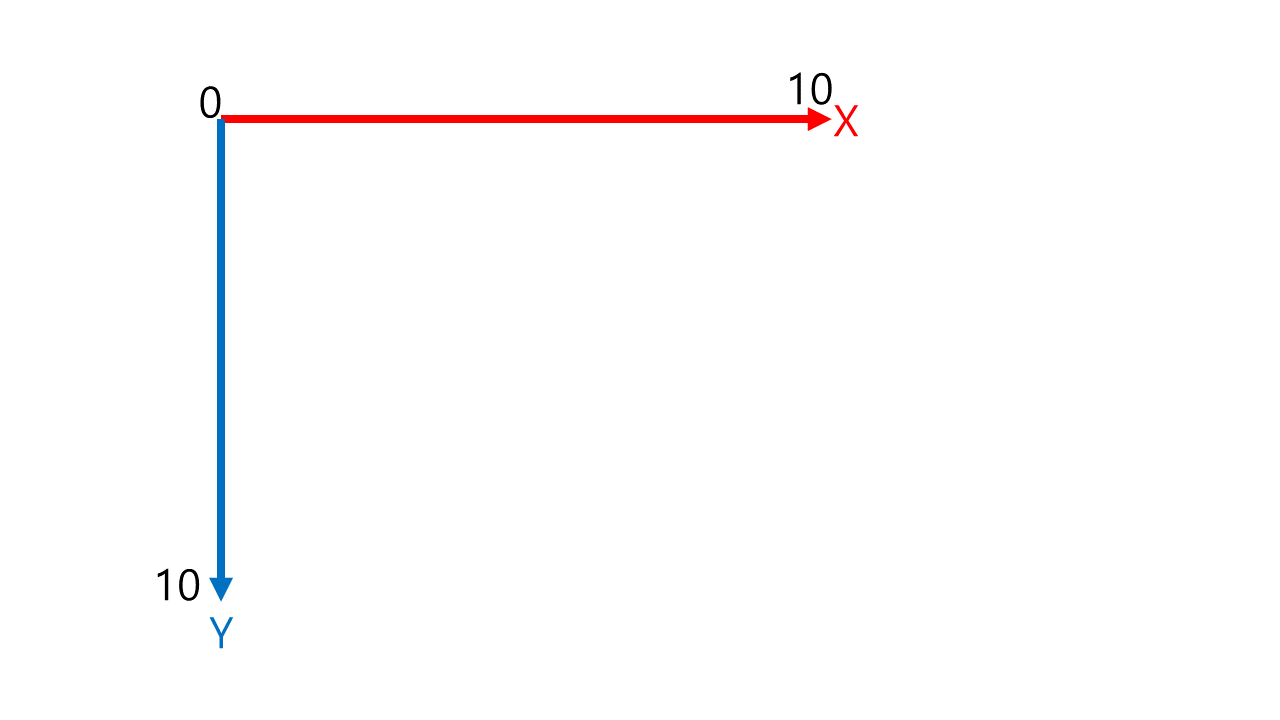
그리고 주의해야할 점이 있다. Vector Drawable은 좌표평면상에 그림을 그리는 것이라고 생각할 때 x축은 그대로지만
y축이 아래로 내려갈 때 값이 커진다는 것이다.
    <string name="path_start">
        M 0 0 L 0 12 L 0 24 L 24 12 Z
    </string>
다음 코드를 통해 그림이 그려지는 과정을 보자.
- M 0 0 : (0, 0)에 시작점을 찍는다.
- L 0 12 : (0, 0)과 (0, 12)를 잇는 직선을 그린다.
- L 0 24 : (0,12)와 (0, 24)를 잇는 직선을 그린다.
- L 24 12 : (0, 24)와 (24, 12)를 잇는 직선을 그린다.
- Z : (24, 12)에서 시작점이 (0, 0)으로 돌아가는 직선을 그리고 종료한다.
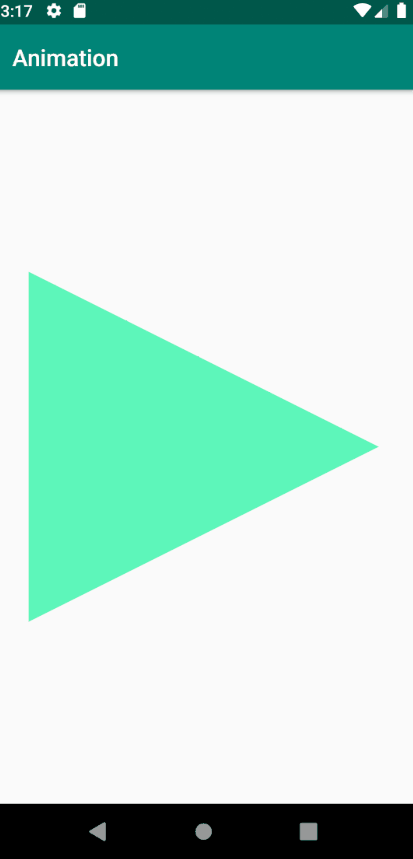
paths에 있는 그림은 다음과 같은 도형이 된다.
- path_start : 재생모양의 삼각형
- path_pause_left : 일시정지 아이콘 중 왼쪽 사각형
- path_pause_right : 일시정지 아이콘 중 오른쪽 사각형
다음 사이트에서 쉽게 벡터 이미지를 그릴 수 있으니 여기서 미리 만들어 보는 것을 추천한다.
Shape Shifter
Shape Shifter simplifies the process of creating SVG-based icon animations.
shapeshifter.design
res/drawable/ic_play.xml
<?xml version="1.0" encoding="utf-8"?>
<vector xmlns:android="http://schemas.android.com/apk/res/android"
    android:width="300dp"
    android:height="300dp"
    android:viewportWidth="24"
    android:viewportHeight="24">

    <group
        android:name="anim_rotation"
        android:pivotX="12.0"
        android:pivotY="12.0">

        <path
            android:name="play_to_pause_1"
            android:fillColor="@color/mint"
            android:pathData="@string/path_start"/>

        <path
            android:name="play_to_pause_2"
            android:fillColor="@color/mint"
            android:pathData="@string/path_start"/>
    </group>

</vector>
재생모양의 아이콘을 만들어준다. pathData 속성에 paths에 작성한 "path_start"를 넣어준다. path의 추가적인 속성들로 아이콘들을 꾸며줄 수 있는데 다음과 같다.
- android:fillAlpha : 내부 색의 투명도 설정
- android:fillColor : 내부 색 설정
- android:strokeAlpha : 테두리 색의 투명도 설정
- android:strokeColor : 테두리 색 설정
- android:strokeWidth : 테두리 굵기 설정
<path>를 <group>으로 한데 묶어서 한 번에 지정해 줄 수 있다. <group>의 특성과 속성은 다음과 같다.
- <group>에 속한 <path>들은 <group>의 속성에 영향을 받는다.
- scale, rotation, translation의 우선순위를 가지고 있다.
<?xml version="1.0" encoding="utf-8"?>
<vector xmlns:android="http://schemas.android.com/apk/res/android"
    android:width="300dp"
    android:height="300dp"
    android:viewportWidth="24"
    android:viewportHeight="24">

...
</vector>
아이콘 xml 최상위는 <vector>태그로 감싸져 있는데 아이콘의 전체적인 크기에 관한 속성을 설정할 수 있다.
- width & height = 아이콘의 가로 세로 크기를 설정한다.
- viewportWidth & viewportHeight = 아이콘의 가로 세로축의 좌표평면점을 표시한다.
위를 예시로 들면 가로 세로가 300dp 크기에 24 x 24로 구성된 좌표평면이 완성되는 것이다.
재생 아이콘을 만드는데 삼각형 하나만 필요하면 되는데 왜 똑같은 삼각형을 두개를 만들었는지 궁금한 사람이 있을 것이다. 그 이유는 좀 더 진행한 뒤에 설명하겠다.
res/drawable/ic_pause.xml
<?xml version="1.0" encoding="utf-8"?>
<vector xmlns:android="http://schemas.android.com/apk/res/android"
    android:width="300dp"
    android:height="300dp"
    android:viewportWidth="24"
    android:viewportHeight="24">

    <group
        android:name="anim_rotation_2"
        android:pivotX="12.0"
        android:pivotY="12.0">

        <path
            android:name="pause_to_play_1"
            android:fillColor="@color/mint"
            android:pathData="@string/path_pause_left"/>

        <path
            android:name="pause_to_play_2"
            android:fillColor="@color/mint"
            android:pathData="@string/path_pause_right"/>
    </group>

</vector>
일시정지 아이콘도 만들어 준다.
애니메이션 설정
애니메이션을 적용할 아이콘은 VectorDrawable을 이용해 만들어주었으면 이제 실제 적용될 애니메이션을 만들면 된다.
res/drawable/anim_vector_play_to_pause.xml
<?xml version="1.0" encoding="utf-8"?>
<animated-vector xmlns:android="http://schemas.android.com/apk/res/android"
    xmlns:tools="http://schemas.android.com/tools"
    xmlns:aapt="http://schemas.android.com/aapt"
    android:drawable="@drawable/ic_play"
    tools:targetApi="lollipop">

    <target android:name="anim_rotation">
        <aapt:attr name="android:animation">
            <set
                android:fillAfter = "true"
                android:ordering="together">
                <objectAnimator
                    android:duration="400"
                    android:propertyName="rotation"
                    android:valueFrom="0"
                    android:valueTo="180"
                    />
            </set>
        </aapt:attr>
    </target>

    <target android:name="play_to_pause_1">
        <aapt:attr name="android:animation">
            <set
                android:fillAfter="true"
                android:ordering="together">
                <objectAnimator
                    android:duration="400"
                    android:propertyName="pathData"
                    android:valueType="pathType"
                    android:valueFrom="@string/path_start"
                    android:valueTo="@string/path_pause_left"
                    />
            </set>
        </aapt:attr>
    </target>

    <target android:name="play_to_pause_2">
        <aapt:attr name="android:animation">
            <set
                android:fillAfter="true"
                android:ordering="together">
                <objectAnimator
                    android:duration="400"
                    android:propertyName="pathData"
                    android:valueType="pathType"
                    android:valueFrom="@string/path_start"
                    android:valueTo="@string/path_pause_right" />
            </set>
        </aapt:attr>
    </target>

</animated-vector>
최상단 <animated-vector>태그에 drawable 속성으로 우리가 만든 ic_play.xml을 넣어주고, targetApi 속성에 lollipop을 추가해준다. 이렇게 하는 이유는 API 버전으로 인한 lint 오류를 막기 위함이다.
<target>태그 name 속성을 이용해 애니메이션을 적용시킬 부분을 설정해준다. ic_play.xml에 있는 <group>과 <path>태그의 name 속성과 일치한다.
animation 속성을 이용해 애니메이션 xml과 연동시킬 수 있지만 그렇게 하게 되면 xml 파일이 늘어나기 때문에
<aapt:attr>태그를 이용해 바로 애니메이션까지 구현해 주었다.
<set>태그를 통해 적용한 속성은 다음과 같다.
- android:fillAfter : 애니메이션이 적용된 후에 그 상태로 놔둘 것인지 설정
- android:ordering : <set>태그안에 있는 애니메이션들을 한꺼번에 적용시킬 것인지 설정
<objectAnimatior>에 있는 코드가 진정한 애니메이션이 적용되는 부분이다.
 <target android:name="anim_rotation">
        <aapt:attr name="android:animation">
            <set
                android:fillAfter = "true"
                android:ordering="together">
                <objectAnimator
                    android:duration="400"
                    android:propertyName="rotation"
                    android:valueFrom="0"
                    android:valueTo="180"
                    />
            </set>
        </aapt:attr>
    </target>
아이콘을 0도에서 180도로 회전시키는 애니메이션을 설정한다. 시간초는 400(ms)로 0.4초동안 해당 애니메이션을 실행한다.
<target android:name="play_to_pause_1">
        <aapt:attr name="android:animation">
            <set
                android:fillAfter="true"
                android:ordering="together">
                <objectAnimator
                    android:duration="400"
                    android:propertyName="pathData"
                    android:valueType="pathType"
                    android:valueFrom="@string/path_start"
                    android:valueTo="@string/path_pause_left"
                    />
            </set>
        </aapt:attr>
    </target>
삼각형의 재생 버튼을 일시정지 버튼으로 바꾸는 애니메이션이다. propertyName을 "pathData"로 설정하고 valueType을 "pathType"으로 설정하면 path를 변형시키는 path Morphing을 할 수 있게 된다. 이 전에 왜 똑같은 삼각형을 두개 만들었는지 기억하는가? 그 이유가 바로 path Morphing 때문이다. path Morphing을 할 때 주의점이 있는데 주의점은 다음과 같다.
- A 모양을 B 모양으로 바꿀 때 같은 숫자의 drawing command가 필요하다.
- A 모양을 구성하는 drawing command의 타입이 B 모양의 drawing command와 같아야 한다.
- path Morphing은 1:1로 구성된다.
요약하자면 drawing command가 3개인 모양에서 4개인 모양으로 바꿀 수 없고, L 커맨드 자리가 온 곳에 C커맨드가 와서는 안된다. 그리고 path Morphing은 1:1이기 때문에 일시정지 버튼의 왼쪽 사각형과 오른쪽 사각형과 대응되는 삼각형을 두 개 만들어준것이다.
res/drawable/anim_vector_pause_to_play.xml
<?xml version="1.0" encoding="utf-8"?>
<animated-vector xmlns:android="http://schemas.android.com/apk/res/android"
    xmlns:tools="http://schemas.android.com/tools"
    xmlns:aapt="http://schemas.android.com/aapt"
    android:drawable="@drawable/ic_pause"
    tools:targetApi="lollipop">

    <target android:name="anim_rotation_2">
        <aapt:attr name="android:animation">
            <set
                android:fillAfter = "true"
                android:ordering="together">
                <objectAnimator
                    android:duration="400"
                    android:propertyName="rotation"
                    android:valueFrom="180"
                    android:valueTo="360"
                    />
            </set>
        </aapt:attr>
    </target>

    <target android:name="pause_to_play_1">
        <aapt:attr name="android:animation">
            <set
                android:fillAfter="true"
                android:ordering="together">
                <objectAnimator
                    android:duration="400"
                    android:propertyName="pathData"
                    android:valueType="pathType"
                    android:valueFrom="@string/path_pause_left"
                    android:valueTo="@string/path_start"
                    />
            </set>
        </aapt:attr>
    </target>

    <target android:name="pause_to_play_2">
        <aapt:attr name="android:animation">
            <set
                android:fillAfter="true"
                android:ordering="together">
                <objectAnimator
                    android:duration="400"
                    android:propertyName="pathData"
                    android:valueType="pathType"
                    android:valueFrom="@string/path_pause_right"
                    android:valueTo="@string/path_start"
                    />
            </set>
        </aapt:attr>
    </target>

</animated-vector>
재생버튼에서 일시정지 버튼으로 애니메이션과 반대로 일시정지 버튼에서 재생버튼으로 돌아가는 애니메이션도 만들어준다.
res/layout/activity_main.xml
<?xml version="1.0" encoding="utf-8"?>
<androidx.constraintlayout.widget.ConstraintLayout xmlns:android="http://schemas.android.com/apk/res/android"
    xmlns:app="http://schemas.android.com/apk/res-auto"
    xmlns:tools="http://schemas.android.com/tools"
    android:layout_width="match_parent"
    android:layout_height="match_parent"
    tools:context=".MainActivity">


    <ImageView
        android:id="@+id/img_icon"
        android:layout_width="wrap_content"
        android:layout_height="wrap_content"
        android:background="?attr/selectableItemBackground"
        app:srcCompat="@drawable/anim_vector_play_to_pause"
        app:layout_constraintBottom_toBottomOf="parent"
        app:layout_constraintEnd_toEndOf="parent"
        app:layout_constraintStart_toStartOf="parent"
        app:layout_constraintTop_toTopOf="parent" />
</androidx.constraintlayout.widget.ConstraintLayout>
activity_main.xml에 이미지뷰를 하나 만들어주고 우리가 만든 애니메이션을 넣어준다.(메인 코드에서 다시 설정하긴 해서 이 부분은 굳이 할 필요 없을 것 같긴 한데 일단 해줬다.) 버튼을 클릭 시 좀 더 생동감을 주기 위해 클릭할 때 물결효과를 주는 옵션을 추가했다.
MainActivity.kt
package org.techtown.animation


import android.graphics.drawable.AnimatedVectorDrawable
import android.os.Build
import androidx.appcompat.app.AppCompatActivity
import android.os.Bundle
import androidx.annotation.RequiresApi
import kotlinx.android.synthetic.main.activity_main.*

class MainActivity : AppCompatActivity() {


    @RequiresApi(Build.VERSION_CODES.LOLLIPOP)
    override fun onCreate(savedInstanceState: Bundle?) {
        super.onCreate(savedInstanceState)
        setContentView(R.layout.activity_main)

        img_icon.setOnClickListener {
            if (img_icon.tag == null){
                img_icon.setImageResource(R.drawable.anim_vector_play_to_pause)
                (img_icon.drawable as AnimatedVectorDrawable).start()
                img_icon.tag = 0
            }
            else{
                img_icon.setImageResource(R.drawable.anim_vector_pause_to_play)
                (img_icon.drawable as AnimatedVectorDrawable).start()
                img_icon.tag = null
            }

        }

    }
}
ImageView를 클릭 할 때 적절하게 변하는 코드를 넣어준다. tag를 이용해서 플레이 상태인지 일시정지 상태인지를 파악하고 그에 따라 적절한 애니메이션을 설정하고 start()함수를 이용해 실행 해준다.
꽤나 횡설수설하면서 작성하긴 했는데 Git에 올린 전체 코드를 보면서 공부하면 이해하기 쉬울 것이다.
지금 예제를 실습하면서 전체적인 VectorDrawable과 Animation 흐름 등을 파악하고 더 나아가 자신만의 아이콘 애니메이션을 만들어 보면 좋을 것 같다.
전체 코드 Git : https://github.com/kangmin1012/AndroidExcercise/tree/VectorAnimation
kangmin1012/AndroidExcercise
Contribute to kangmin1012/AndroidExcercise development by creating an account on GitHub.
github.com
'안드로이드' 카테고리의 다른 글
| [Kotlin]ARCore를 이용한 AR구현(2) - 실제 구현 (1) | 2020.04.02 |
|---|---|
| [Kotlin] ARCore를 이용한 AR 구현 (1) - 세팅 (3) | 2020.04.01 |
| [Android/Kotlin] 카메라로 사진 찍고 이미지뷰에 넣기 (0) | 2020.02.19 |
| [Android/Kotiln] DataBinding(데이터바인딩)3 - Observable(실시간 데이터) (1) | 2020.02.06 |
| [Android/Kotlin] DataBinding(데이터바인딩) 2 - BindingAdapter(바인딩 어댑터) (0) | 2020.01.31 |